AMI is used for the third-party apps to work properly with Asterisk. Therefore the system gets current info on the events and sends appropriate commands.
You can create an AMI User in two ways:
-
configure the file /etc/asterisk/manager.conf;
-
create a user with Asterisk Manager in FreePBX.
Let’s examine both methods in greater detail.
1. Configure the manager.conf file
For starters you should connect to Asterisk server via SSH-protocol and execute the following actions.
Open the file for editing: vi /etc/asterisk/manager.conf
In [general] section specify AMI settings:
[general]
enabled = yes
port = 5038
bindaddr = 0.0.0.0
displayconnects = no
Create a new user under [general] section. In this example the name is test, the password is qwerty123.
[test]
secret = qwerty123
deny = 0.0.0.0/0.0.0.0
permit = N/255.255.255.0*
read = system,call,log,verbose,command,agent,user,config,command,dtmf,reporting,cdr,dialplan,originate,message
write = system,call,log,verbose,command,agent,user,config,command,dtmf,reporting,cdr,dialplan,originate,message
writetimeout = 5000
* Here N is an IP-address from the “From” section of the “Network configurations” chart in Bitrix24 Marketplace app page (the address is unique for each app).
When you’re done with the settings press :x! to save the file.
Then insert:
[root@localhost ~]# asterisk -rx "manager reload"
2. Create an AMI User in FreePBX
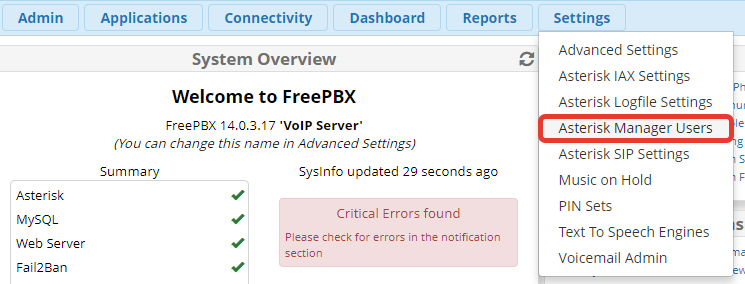
In the upper navigation bar choose Settings and press Asterisk Manager Users.

To add a new user click on Add Manager button.

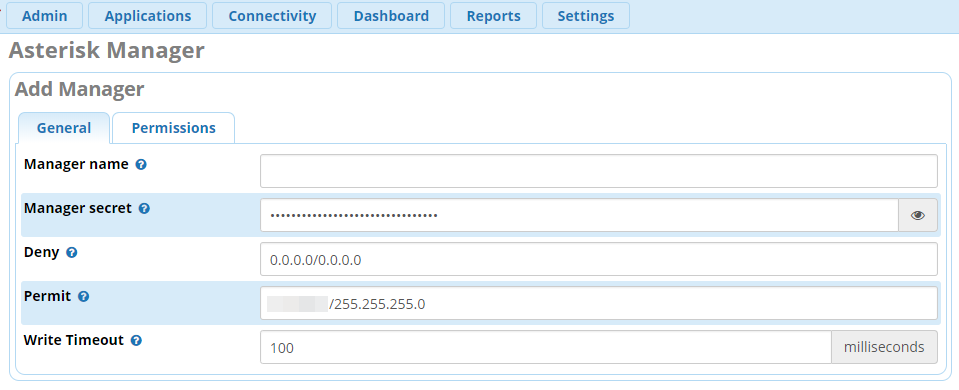
Here you can see the settings window for a new user.

-
Manager Name — Enter AMI User name (it shall not contain any spaces).
-
Manager Secret — Enter password for AMI User.
-
Deny — Here you can indicate an IP-address and subnetwork mask from which you want to restrict the connection to AMI. In order to indicate some subnetworks, use “&” symbol, for example, 192.168.1.0/255.255.255.0&192.168.2.0/255.255.255.0
-
Permit — Indicate an IP-address from the “From” section of the “Network configurations” chart in Bitrix24 Marketplace (the address is unique for each app) and subnetwork mask from which you permit the AMI connection.
-
Write Timeout — The timeout for AMI command execution is to be set to 10,000 ms.
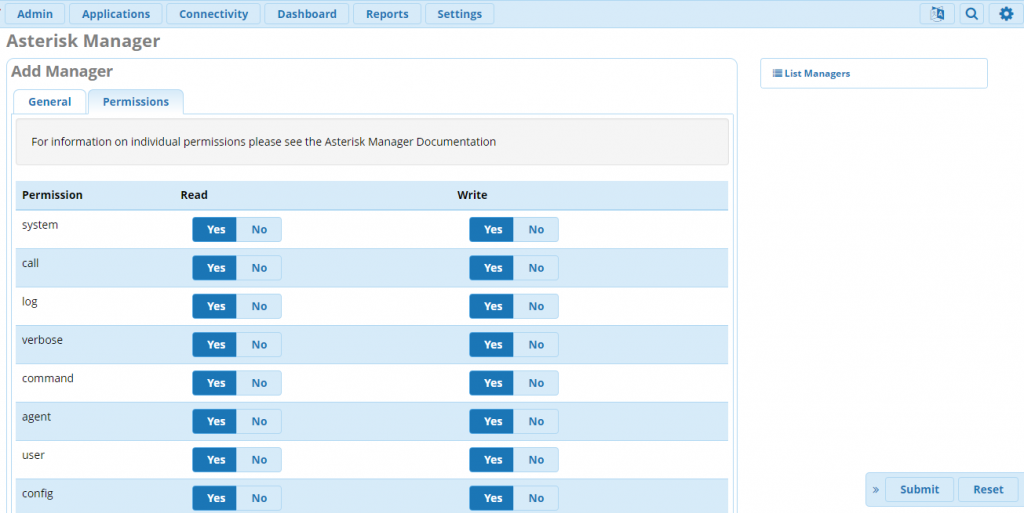
Set the User’s Rights on Permissions tab.

Press Submit.
