Softphone24 is a fully functional browser-based softphone built into Bitrix24 and compatible for all Asterisk users with FreePBX. Softphone24 does not require installing additional software on users’ computers — you can make and receive calls directly from your browser.
To start working with Softphone24, initial configuration is required.
Important:
-
The application works only if the Asterisk Integration is installed and properly configured.
-
The website must have a domain name and a valid SSL certificate.
-
For stable operation, it is recommended to keep one Bitrix24 tab open permanently (the master tab). If the only open tab is refreshed, the softphone needs time to reconnect, and calls will be temporarily unavailable.
1. Network Configuration
To start using Softphone24, please:
-
Configure DNS settings to assign a domain name to your PBX or specify the PBX EXTERNAL ADDRESS (the PBX domain should be accessible to Softphone24 users both from the internal corporate network and from the Internet if remote connections are planned).
-
If you plan to use Softphone24 outside your internal network, configure port forwarding for the EXTERNAL PORT (the WebSocket port accessible to users from both the internal network and the Internet; typically it is port 8089) on your router to the PBX on port 8089.
The current port settings can be checked in:
Settings → Advanced Settings → HTTPS Bind Port.
-
Adjust firewall settings on the PBX.
2. FreePBX Configuration
2.1. Checking the mini-http Server
Open a new browser tab and navigate to:
https://<PBX_EXTERNAL_ADDRESS>:<EXTERNAL_PORT>/ws
A page similar to the following should ope:
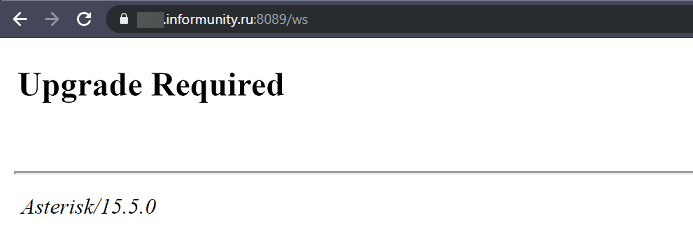
This confirms that the mini-http server is functioning correctly.
-
If you see a security warning indicating the connection is unsafe, you need to configure the SSL certificate.
-
If the page does not open at all, check the mini-http server settings.
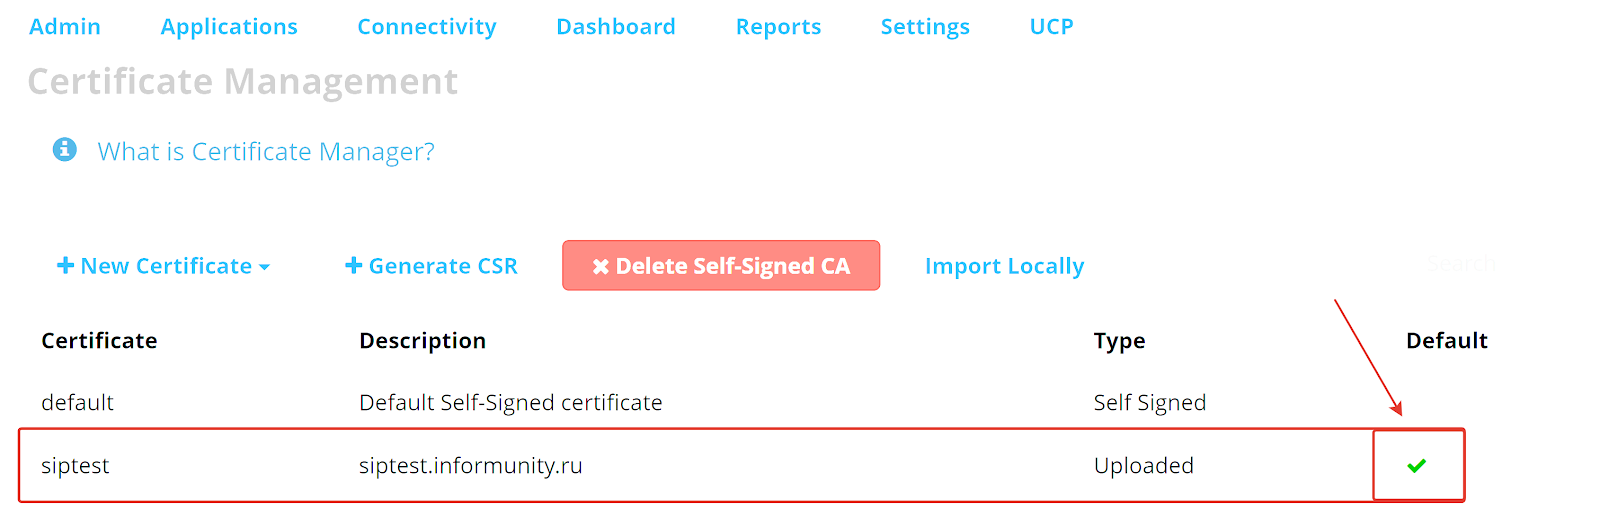
2.2. SSL Certificate Configuration
-
To configure a certificate, use:
FreePBX Applications → Certificate Manager. -
To upload an existing certificate for the PBX EXTERNAL ADDRESS:
New Certificate → Upload Certificate -
If you do not have a certificate, generate one using:
New Certificate → Generate Let’s Encrypt Certificate -
Important: You must monitor the SSL certificate expiration date and renew it on time.

-
After uploading or generating the certificate, set it as the default one by selecting the certificate and clicking the “Default” field next to it.
2.3. Configuring the mini-http Server and Extensions
2.3.1. mini-http Server Setup
Go to:
-
Settings → Advanced Settings
-
Set the following options to Yes:
-
The HTTPS Bind Address field must match your network configuration (default value is "::).
-
The HTTPS Bind Port field must be filled (default value is 8089).
- Enable the mini-HTTP Server
- Enable TLS for the mini-HTTP Server
2.3.2. Configuring SIP or PJSIP Driver
When selecting the appropriate driver, consider the following:
-
The mini-HTTP server can work with only one driver: SIP or PJSIP.
-
The driver (type) of extensions connected to Softphone24 must match the value configured in the Force WebSocket Mode field*.
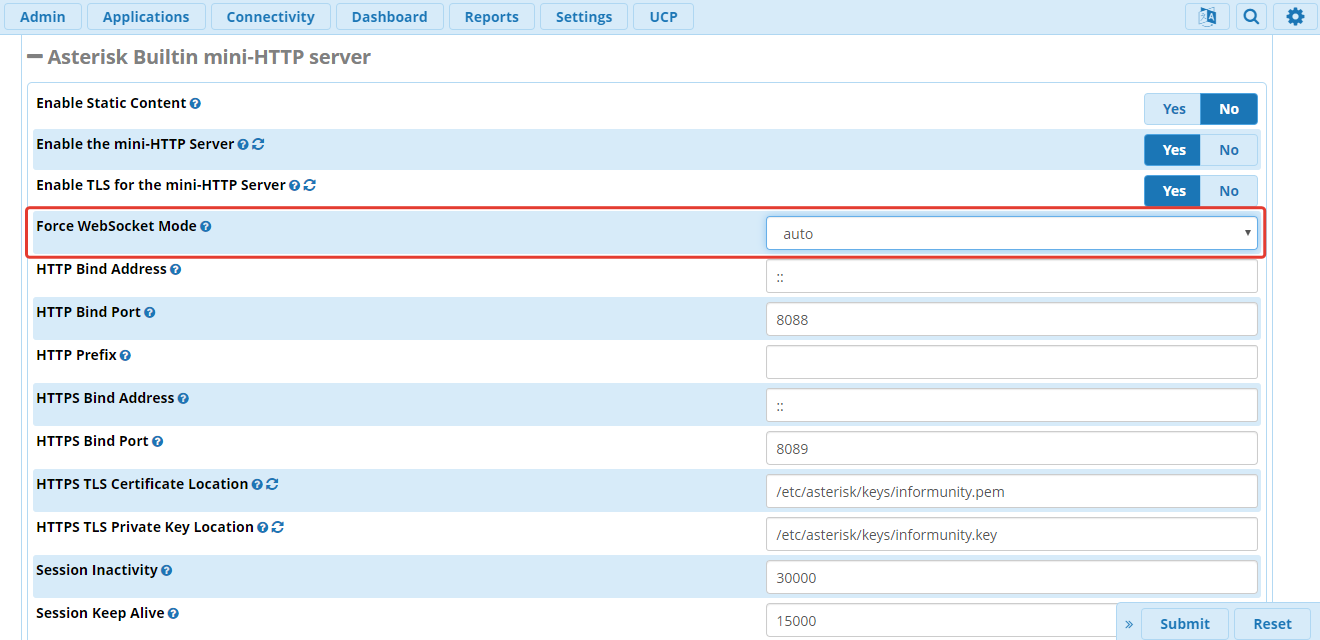
-
The value of Force WebSocket Mode, which needs to be set for working with a specific driver, is reflected in the table below.
|
SIP Channel Driver |
Force WebSocket Mode |
|
chan_sip |
auto |
|
chan_sip |
sip |
|
chan_pjsip |
pjsip |
* To display and enable editing of the 'Force WebSocket Mode' parameter, you need to activate two parameters: 'Display Readonly Settings' and 'Override Readonly Settings', as shown in the picture below.
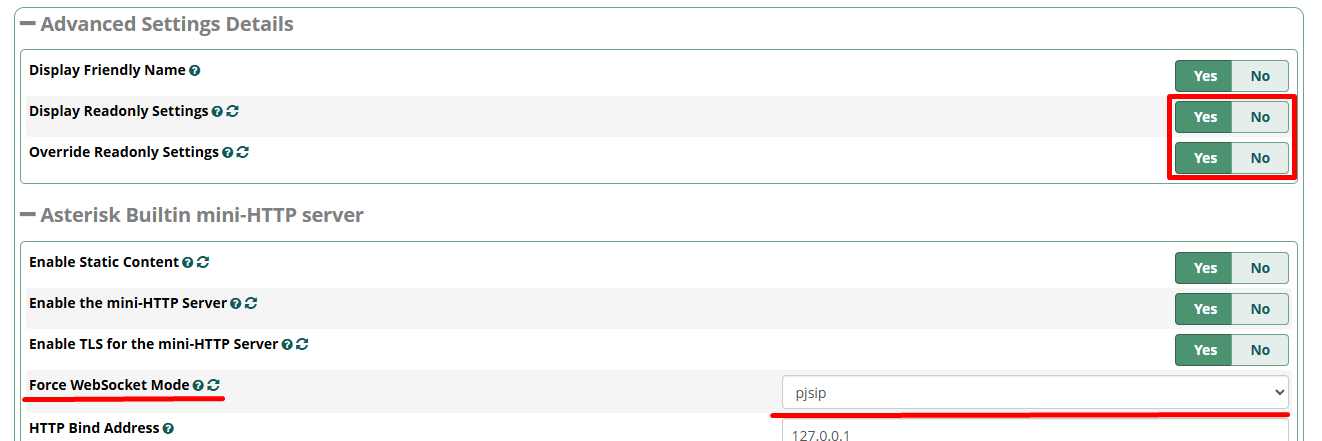
** If SIP Channel Driver is chan_sip and Force WebSocket Mode is set to pjsip, or vice versa ("chan_pjsip" with "sip"), Softphone24 will not be able to connect.
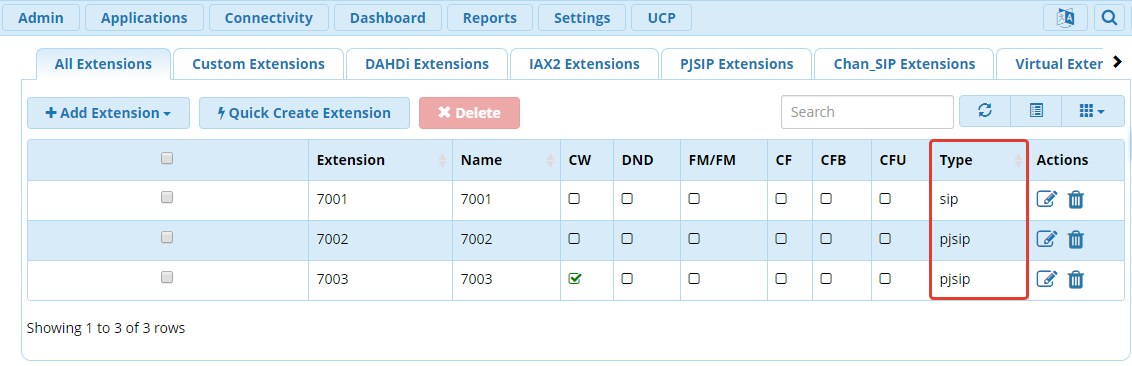
2.3.3. Configuring Extensions for WebSocket
-
PJSIP Configuration
In the top menu Go to: Applications → Extensions
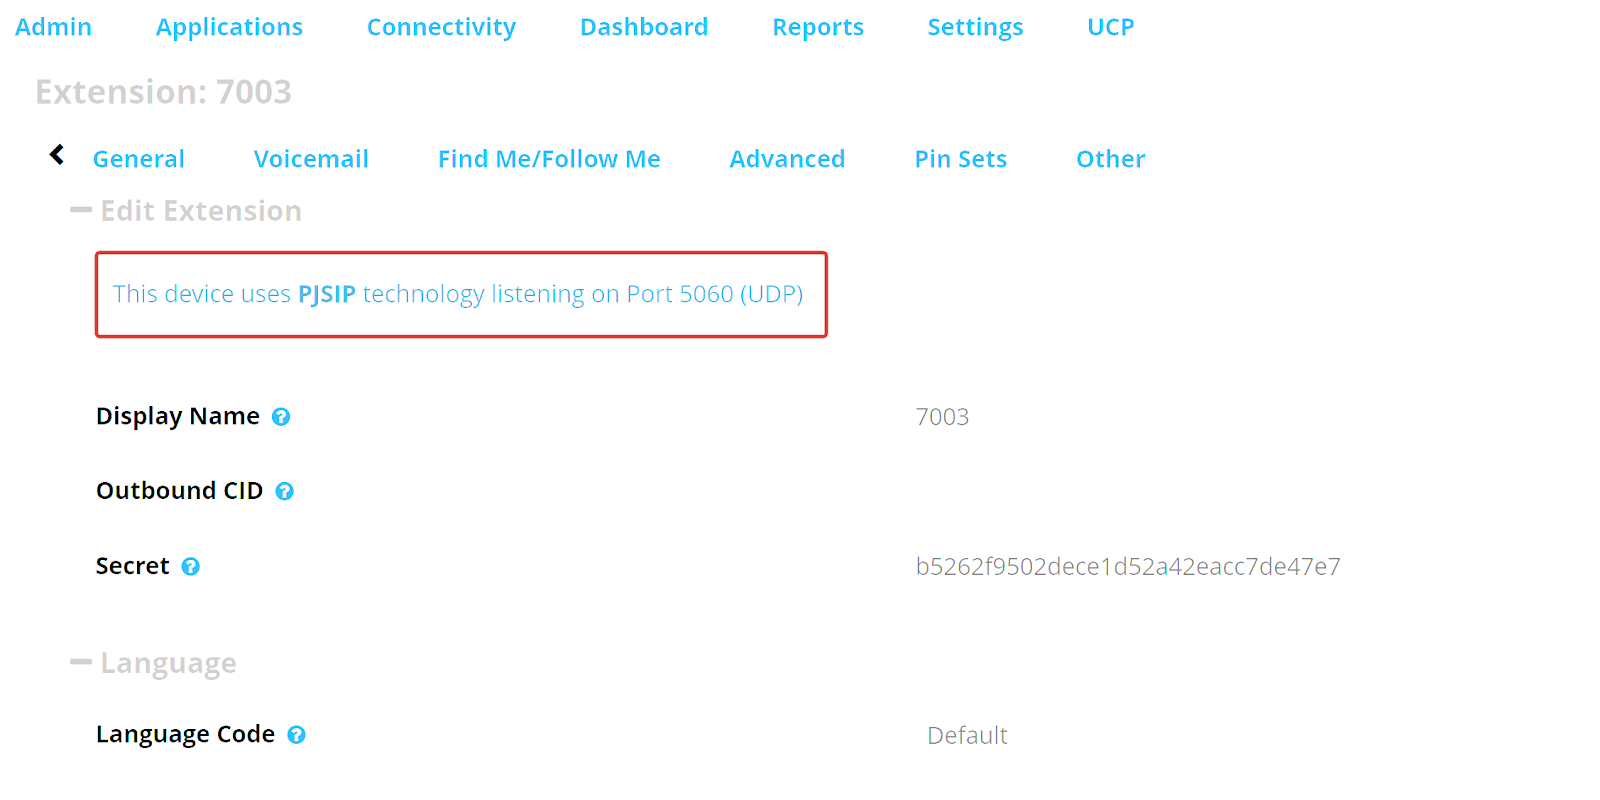
Open the extension settings and ensure the extension uses PJSIP.
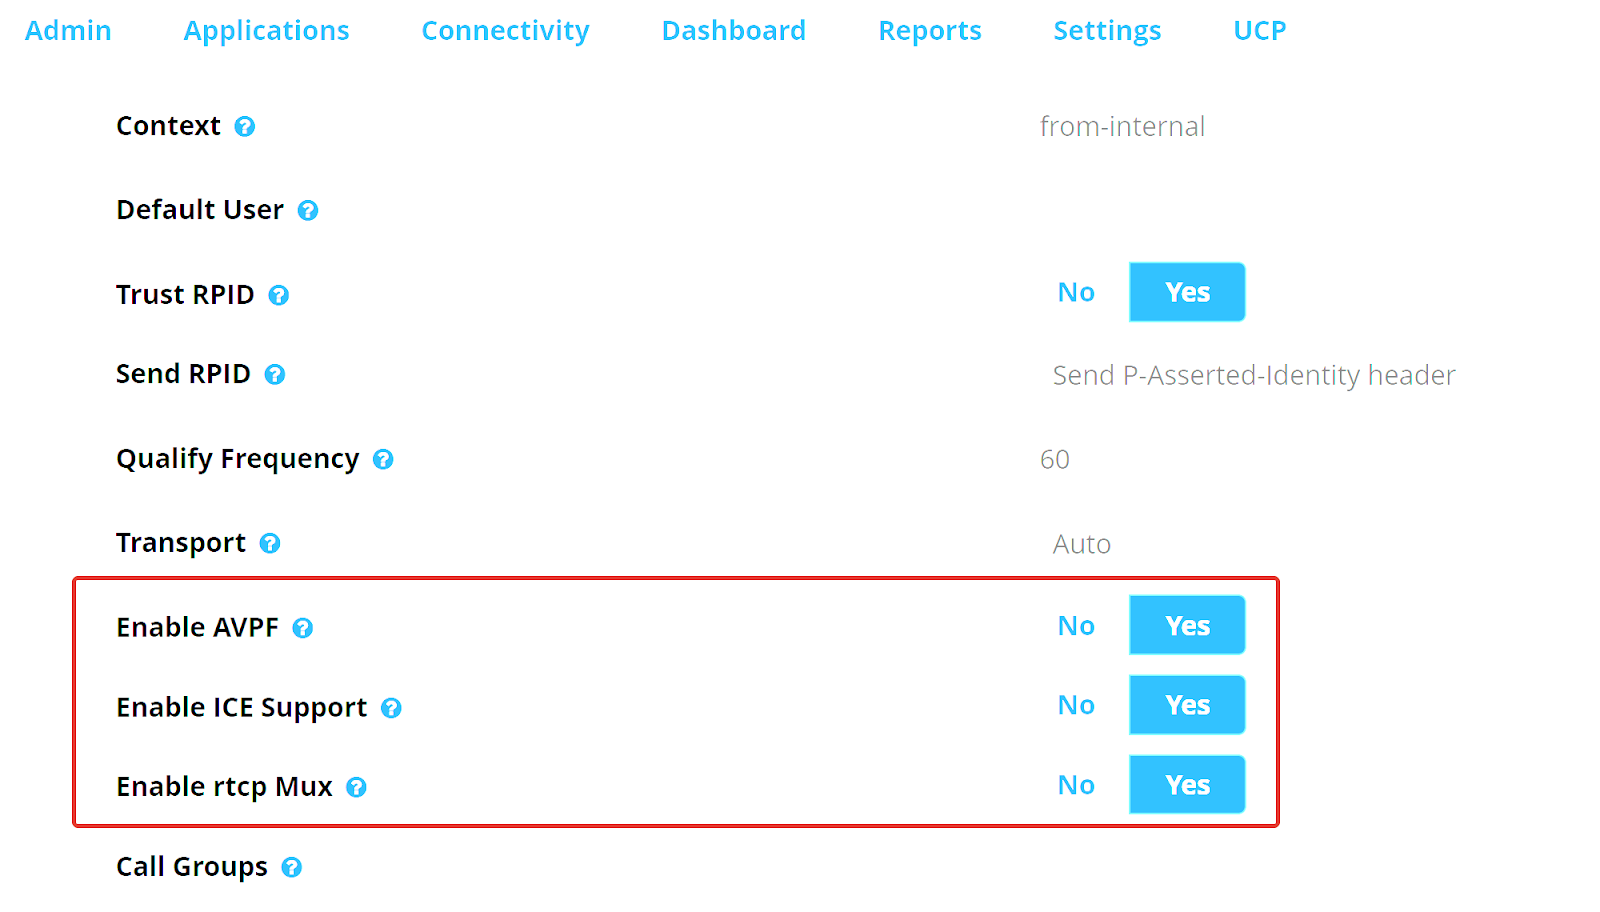
Go to the Advanced tab, set the following options to Yes:
-
Enable AVPF
-
Enable ICE Support
-
Enable rtcp Mux
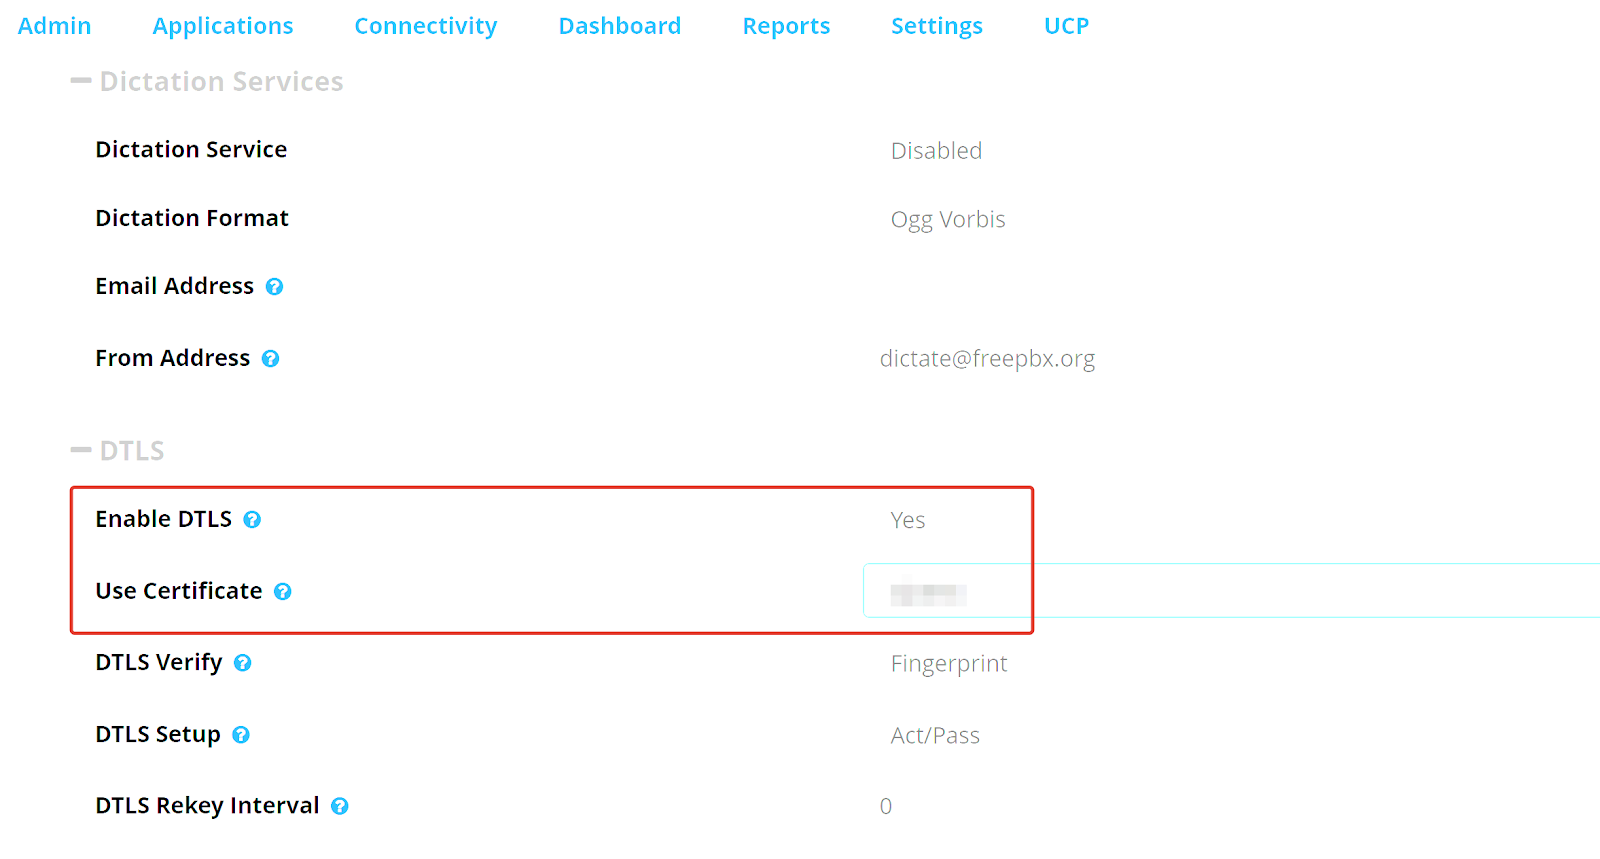
Scroll down and configure DTLS settings:
Enable DTLS → Yes
Select the required certificate

-
SIP Configuration
Go to: Applications → Extensions
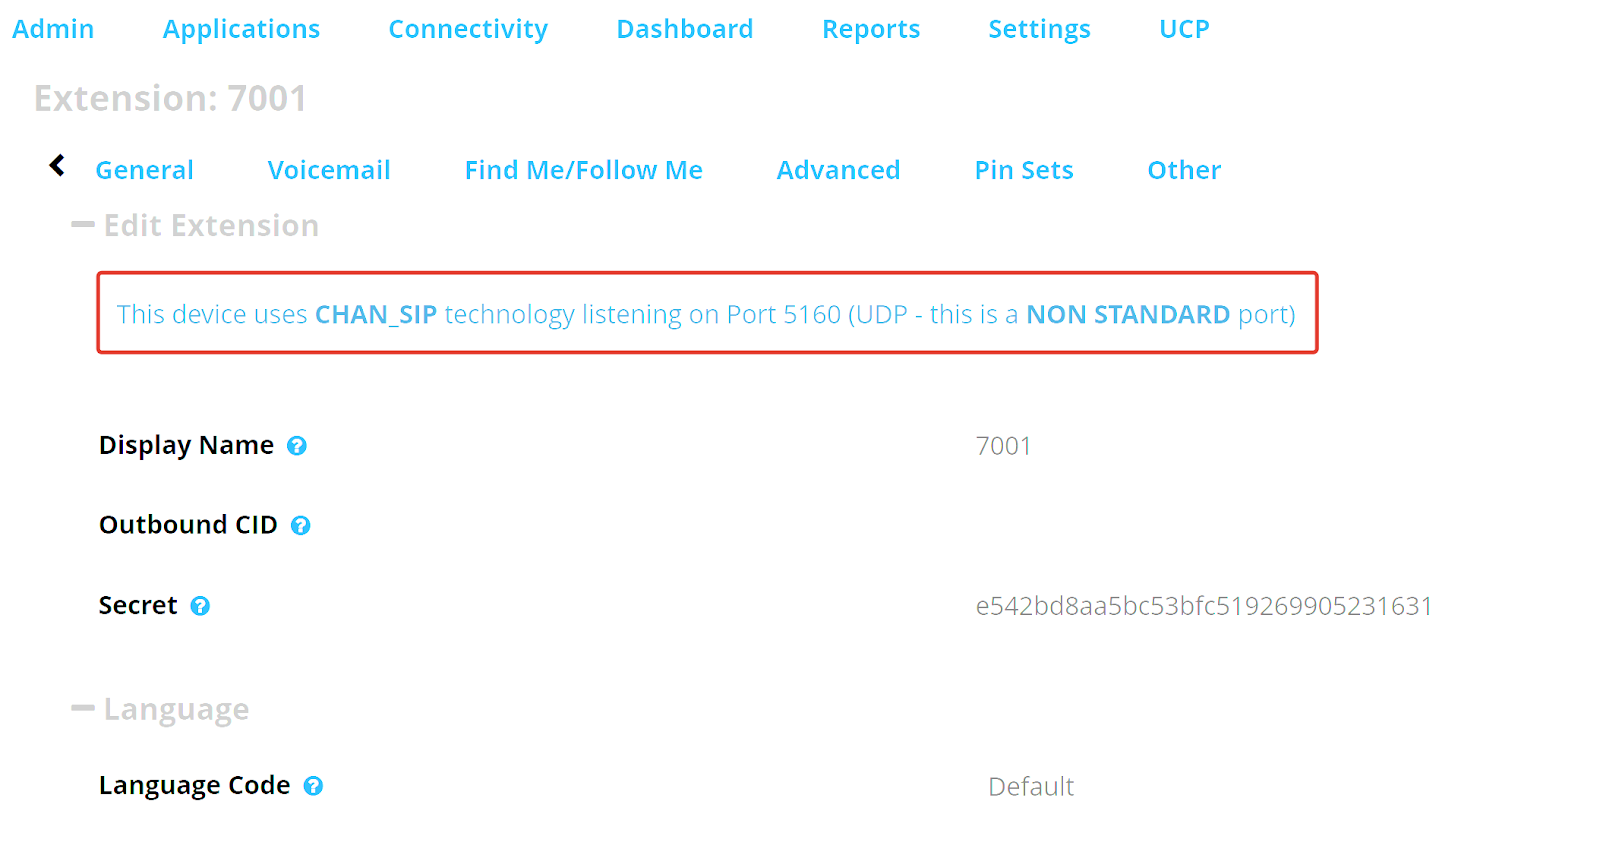
Open the extension settings and ensure the extension uses SIP.
On the Advanced tab, set the following options to Yes:
-
Enable AVPF
-
Force AVP
-
Enable ICE Support
-
Enable rtcp Mux
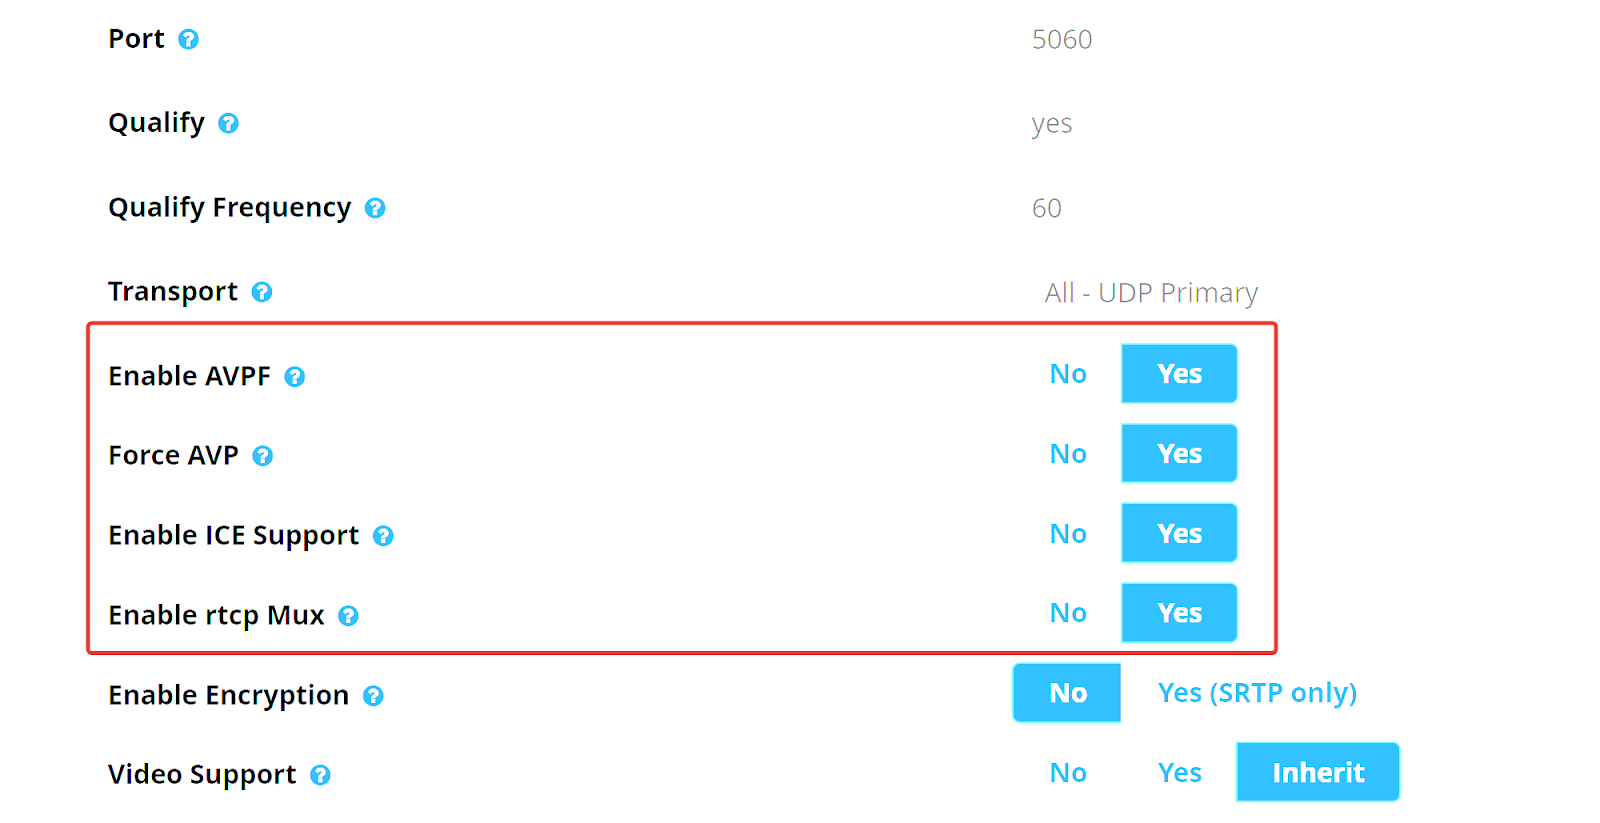
Scroll down and configure DTLS settings:
Enable DTLS → Yes
Select the required certificate
3. Bitrix24 Application Configuration
3.1. Installation and Initial Setup
If installing the application in the self-hosted (on-premise) version of Bitrix24, ensure your portal runs over HTTPS and has a valid SSL certificate.
For the cloud version, this is enabled by default.
Install the Softphone24 application from the Bitrix24 Marketplace if you have not already done so.
Open: Contact Center → Telephony → Telephony Settings → Telephony Users
Verify that internal extension numbers are assigned to employees who will use the softphone.
Open the application settings page (the Softphone24 menu item appears after installation).
At the top of the page, the following fields are available:
- PBX Address (read-only; automatically filled from the integration module and must match the PBX EXTERNAL ADDRESS)
- WSS Port (enter the EXTERNAL PORT value)

After configuring the FreePBX connection, proceed with user configuration.
On the same page, you will see all users with assigned internal extensions (corresponding to the PBX).
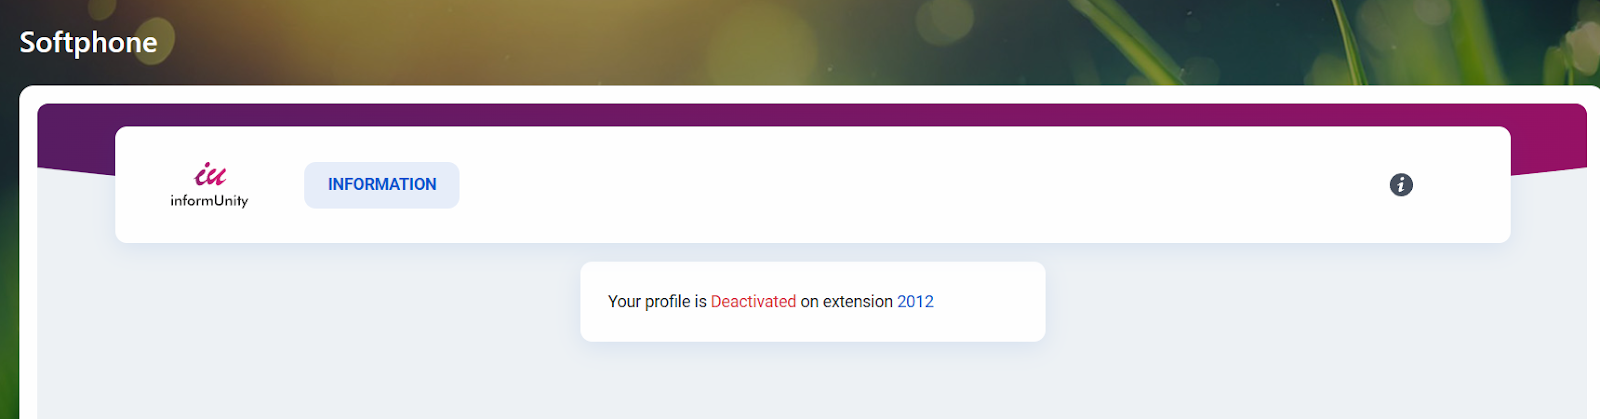
Each user has a toggle switch to enable or disable the softphone.
Activate the softphone for users who need it.
If the FreePBX extension settings are incorrect, a tooltip will appear next to the user’s name indicating which parameters are misconfigured.
More details on extension configuration are provided in section 2.3.3.

Softphone management (enabling/disabling users) is available only to administrators.
Non-admin users will only see their current status on the application page.
If related settings are changed in FreePBX (for example, extension passwords, PBX address, etc.), an Update button will appear at the top of the application settings page next to the PBX address field. Clicking this button synchronizes the changes.
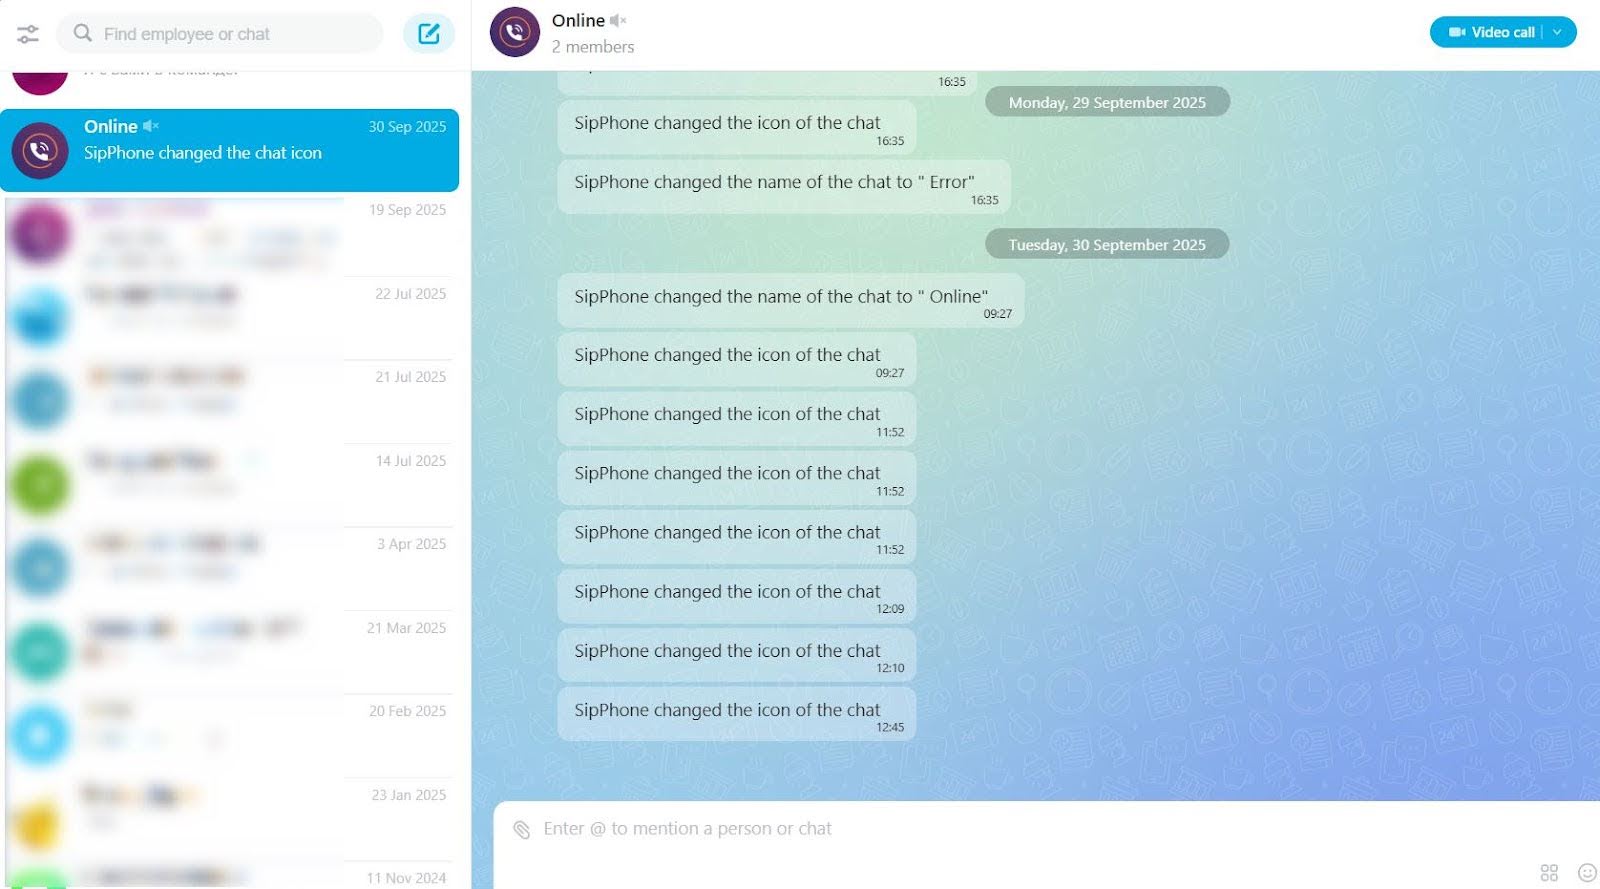
The current softphone status is communicated to the user via a dedicated bot.
4. Legal Terms and Limitation of Liability
For proper operation of Softphone24 application, both servers (Bitrix24 and FreePBX) must have valid SSL certificates (HTTPS).The developer is not responsible for:
Incorrect application operation if a valid SSL certificate is missing on the client side;
Softphone24 malfunctions caused by an invalid, expired, or improperly configured security certificate;
Data loss or service interruptions resulting from the absence of a secure HTTPS connection between the application and the FreePBX server;
Incorrect application operation caused by network issues between the Bitrix24 server and the FreePBX server.
If you still have questions about how Softphone24 works, please contact us via chat