System requirements
| From | Where | Port | Protocol |
| FreePBX | license.informunity.es | 443 | https |
| FreePBX | “Bitrix24 address”:address | “Bitrix24 address”:port | http/https |
| FreePBX | oauth.bitrix.info | 443 | https |
| license.informunity.es | FreePBX | “FreePBX address”:port | http/https |
| license.informunity.es | “Bitrix24 address”:address | “Bitrix24 address”:port | http/https |
-
FreePBX server must have continuous access to license.informunity.es:443.
-
FreePBX server must have continuous access to Bitrix24 portal, which address is indicated in "Bitrix24 address" field.
-
license.informunity.es must have recurring (once a day) access to 443 port via FQDN address of Bitrix24 portal.
-
FreePBX server must be permanently available via address, indicated in the "FreePBX address" field for license.informunity.es (34.252.155.135; 195.201.40.10; 54.220.234.168).
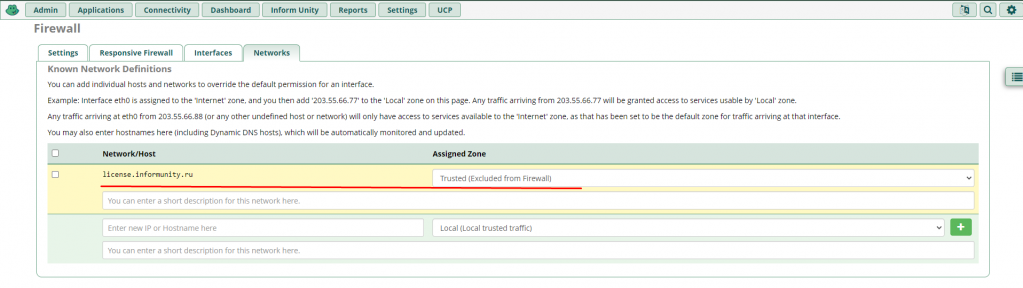

In Firewall settings configure the following:
iptables -t nat -A PREROUTING -i eth0 -s 54.220.234.168/32 -p tcp -d 177.177.177.177/32 --dport 80 -j DNAT --to-destination 10.0.4.2:80
General module settings

1. Module installation in FreePBX
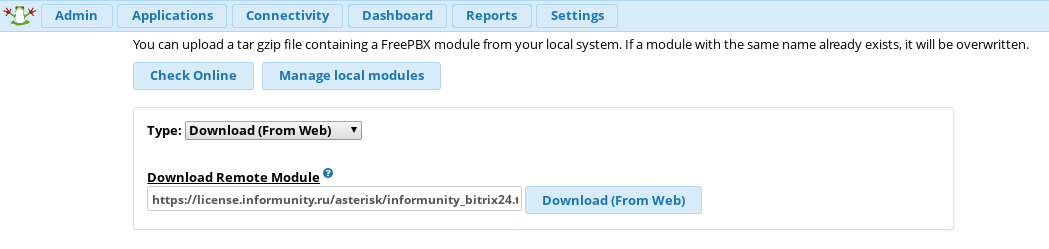
To install the module, go to FreePBX control panel → Module Administration and choose Upload Modules:

Enter module’s URL https://license.informunity.es/asterisk/iub24v2.tar.gz and click Download:
Click on the pic to enlarge the image
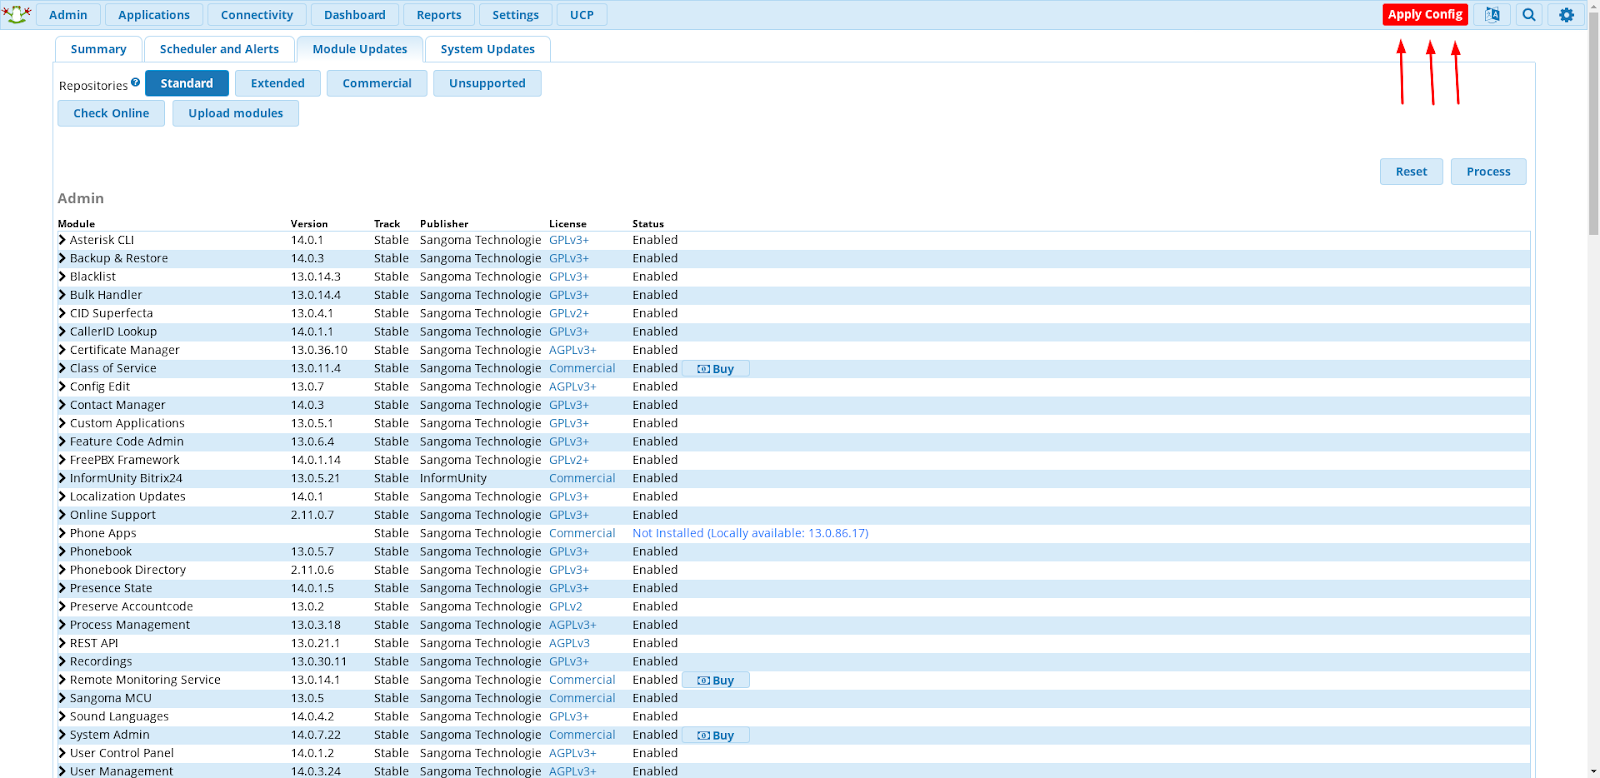
Follow the link Local module administration or Manage local modules. Select module Informunity Bitrix24 in the Admin section, choose Install and Process. After that select "confirm" and wait for the end of installation. Press Return.
Next, press Apply Config.
2. Registration
Before the registration, we recommend to set up a special user account (for example, PBX) with administrator rights and proceed the registration process on behalf of this account. As a result, you avoid two problems:
-
A priori the entities in Bitrix24 are created in the name of the user who registered the module. Using a separate account helps to avoid the mix up while creating and changing the entities.
-
The user whose account is used for module registration must have the administrator rights for CRM, Tasks, Open lines, Users, Telephony, Disk, Chat, and notifications. If the rights are changed, the module can stop working correctly. In order to avoid this, we recommend creating a separate user account with all listed rights.
Before registration make sure that the Integration with Asterisk app is installed in your Bitrix24.
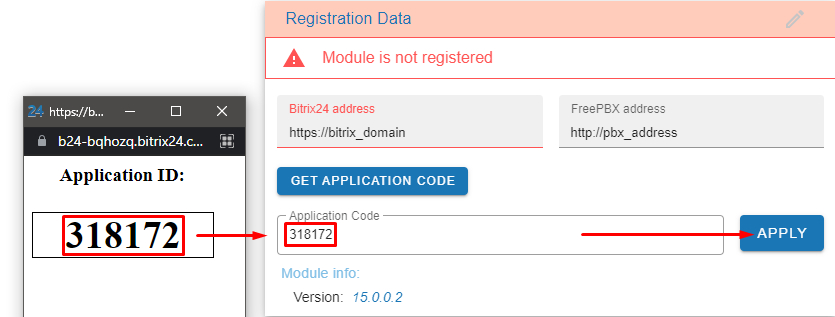
To register the module, fill in the Bitrix24 address and FreePBX address fields, click the GET APPLICATION CODE button and wait for the additional browser window to appear.
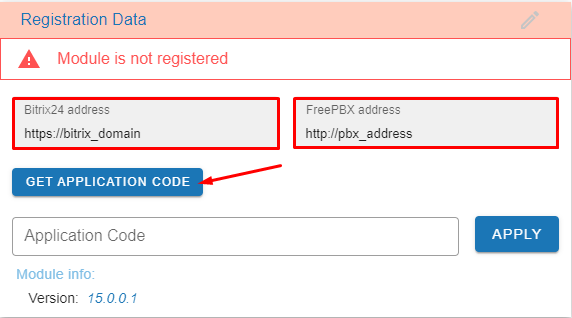
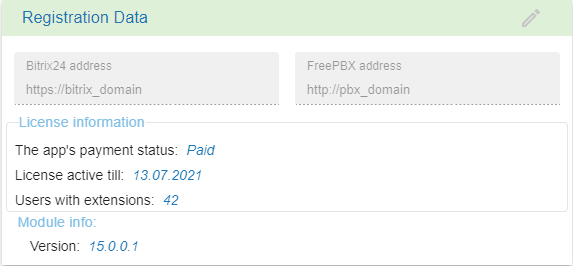
In the Access Code field, enter the received code, and log in to Bitrix24 as an administrator, if it is necessary. Then click Apply. As result, the screen should refresh and display the registration data.
-
The app's payment status — indicates the type of your license (paid or demo);
-
License active till — shows the date up till which the license is active;
-
Users with extensions — specifies the number of Bitrix24 users that are assigned with the internal number in Bitrix24 settings.
3. Settings
In the Settings panel you may introduce changes related to the operation of the whole module.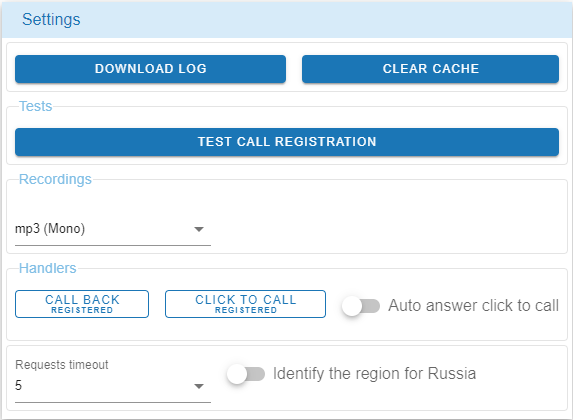
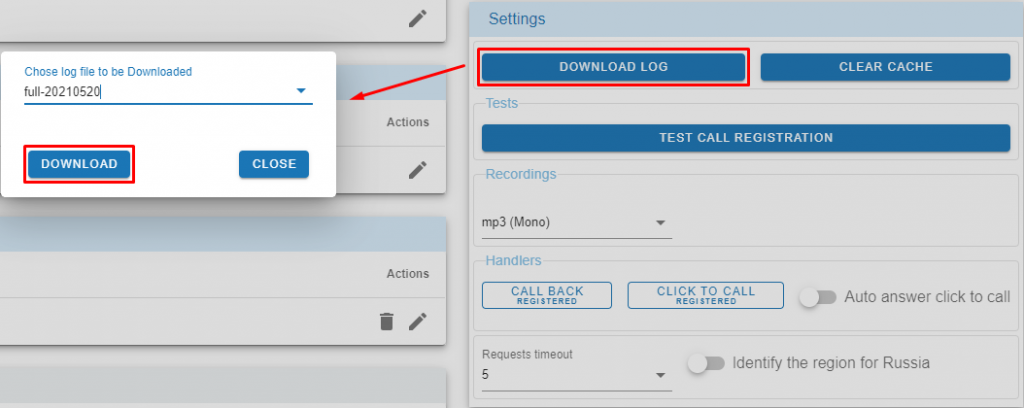
Download log — here you can choose and download a log file from the server. If you use FreePBX Distro, the full file contains the log for the current day, while files with dates contain the logs for the day previous to the indicated date in their names.
Clear Cache — allows clearing cache in Asterisk. Having changed the telephony settings on the side of the Bitrix24 portal, it is necessary to clear the cache in the integration module. Click the Clear Cache button and wait for the message Complete. The cache is cleared automatically once a day.
Tests
Check Card Opening — here you can perform a test call registration and see card representation.
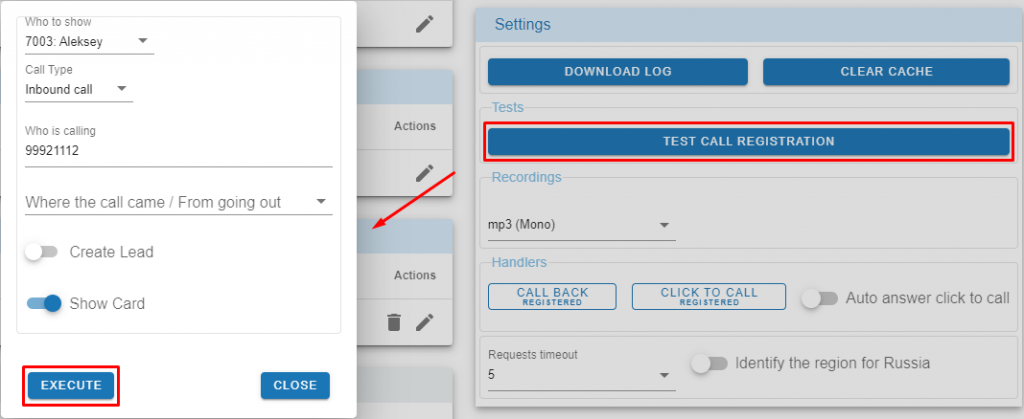
Recordings — in this section, you can choose the format of the conversation recording for further attachment to Bitrix.
mp3 (Mono) — convert wav to mp3 and transmit records to Bitrix24(**Doesn't work with the WAV audio recording storage format).
mp3 (Stereo) — the record is not related to the FreePBX settings. The client's voice goes to channel #1, the operator's voice goes to channel #2.
Don't attach records — don't transmit records.
Links to records — allows automatically adding links to call records from FreePBX to the entity description. If you do not see the Yes option, it means that it is not possible to add links given the chosen records format.
HANDLERS
Handlers — a section for managing the condition of Bitrix handlers.
Click to Call allows making requests to the PBX for placing a call. With the Click to Call handler, the call will come first to the internal number, and then, when the phone pen is picked up, it will be sent to the destination user.
Call Back allows making requests for a callback from the site widget.
Auto Answer Click To Call — if Yes, the call will be automatically picked up on the extension. (This setting works only with the hardware that supports auto-answer function when receiving a specific SIP-header.)
OTHER SETTINGSRequest Timeout, sec. — lets you set the maximum time that the module takes to wait after sending a request to Bitrix24 and/or to the license server. If requests to the portal do not return results by timeout, the first thing to do is to check the response time of the DNS-server that it takes when converting the name to an IP. Or you can register your Bitrix24 address and license.informunity.es to /etc/hosts. The maximum possible value of this field is set only in case of an extremely slow network connection.
Identify the region for Russia — allows changing the Lead's or Contact's address by phone number. This option works only on the territory of the Russian Federation.
4. Routing points
This panel allows creating dial plan elements that later can be used as destinations in other modules and FreePBX routes. To register the incoming calls in Bitrix24, you need not only to configure the elements, but also to include them in the incoming routes.

Click "+" to add a direction element. You will see the settings window.
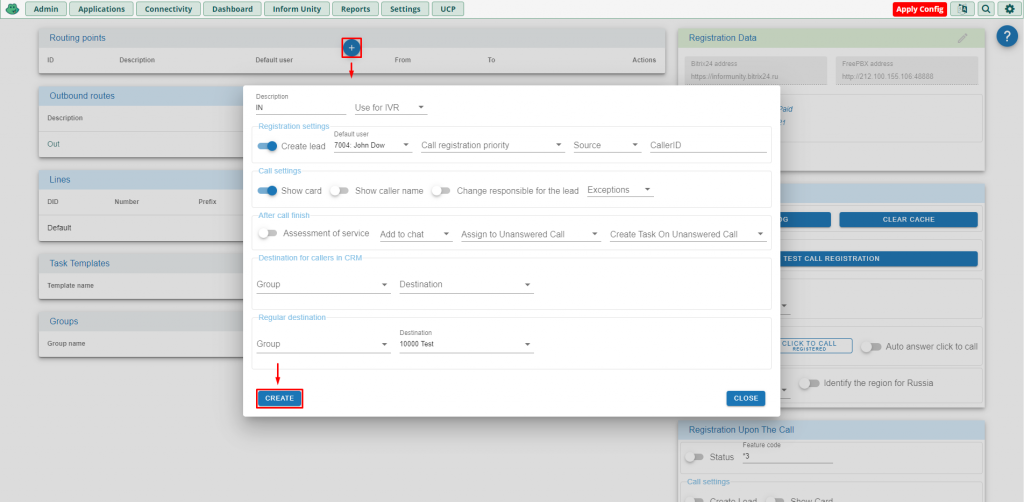
Description — set the destination name.
Use for IVR — this setting expands the capabilities of the Direct Dial function set for the standard IVR and allows registering calls to extensions. To set it up, select one or several IVRs that you want to enable this setting for. In this case, the Destination for Registered Callers and Destination settings do not apply. If a call is routed to an extension from the Exceptions list, it will not be registered.
Registration settings — settings that affect call registration in Bitrix24.
Create Lead — select Yes to create a lead or a deal at the moment of the call in case there is no registered lead, contact, or deal with this phone number in CRM.
Add to chat — here you can choose which calls must be displayed in the chat list: no calls at all, only unanswered, or all calls.
Default User — set the manager who will be responsible for all calls at the moment of their coming. If the call is not taken, the Default User becomes responsible for it. If the call is taken, the responsible person for it is the last person who speaks with the client.
Call Registration Priority — Set a successive priority that will guide choosing a CRM entity for registering the info about calls. If the field says Default, the entities are selected following the default scenario set by Bitrix24. By setting your sequence, you abandon the default scenario.
How it works. Say, you want to attach the info about calls to the Contact entity, provided the caller's number has already been registered in one or more CRM entities.
By setting the priority Contact → Company → Lead, you set the following scenario:
-
First, the integration module asks Bitrix24 for a list of entities that are associated with the caller's number.
-
Then, if the Contact is in the list, the information about the call is attached to the Contact.
-
If there is no Contact, the call is attached to the Company.
-
If there is no Company, the call is attached to the Lead.
-
If the Lead is absent as well, the system creates a new Lead following the standard scenario.
Since by canceling the default logic inherent in Bitrix24, we increase the number of requests made to look for the needed entity, the time the client spends waiting on the line may slightly increase.
Source — specify the source of the call from the Bitrix24 directory. The list of sources is configured in Bitrix24 itself. You can use this option to identify various ad campaigns in case you use different phone numbers. (The source is assigned once — when creating a lead or a deal.)CallerID — allows to convert the caller's CallerID to the required format. Changes the CallerID only as part of the call registration. Default value: ${CALLERID(num)}
Call settings — settings that are taken into account during the call.
Show Card — activate it to show a call card in Bitrix24 when a call is received.
Show Caller Name — activate it if you want the name of the lead or contact from the CRM to be appearing on the phone / softphone when a call is received.
Change responsible for the lead — activate it if you want the responsible person for the lead to be changed every time they respond.
Exceptions — select a list of users for whom calls will not be registered and for whom call cards will not be displayed (the content of the lists is configured in the Exceptions panel).
AFTER CALL ACTIONS — settings are taken into account after the call.
Assign to Unanswered Call — choose who will be responsible for a missed call if the lead, contact, or company with the same number are already registered in CRM: Default User or Assigned Manager. If there are no leads, contacts or deals with this phone number, the call will be registered to the Default User.
Create Task On Unanswered Call — optionally you can choose a template for making tasks in case of missed calls. If this is not necessary, leave Disabled. (The task templates are configured in the Tasks panel.)
Assessment of service — activate it if you want the subscriber to be asked to rate the quality of service (from zero to five) at the end of the call.
Initial message — notification before evaluation.
Final message — notification after evaluation.
Destination for registered callers — here you can specify the destination for the clients already registered in CRM. This setting works only if there is a lead, contact, or company with the indicated phone number in CRM. Otherwise, the setting is ignored.
Destination — you should choose where the call will go: to the responsible manager, internal number, queue, call group, IVR, time conditions...
Dialing Time — the time period during which Asterisk will make attempts to reach the manager.
* If you select Extension & Mobile, the setting is triggered for each call: first, Asterisk will call the extension number for 15 seconds, then to the mobile phone number for the exact same time.
* If you select a queue, a group call, or an IVR, the call will not return to the destination indicated for this route, but it will go to the Failover Destination.
Regular destination — destination for the call after its registration in Bitrix24.
5. Outbound Routes
This panel displays existing outbound routes. To register outgoing calls in Bitrix24, you need to activate the integration on the desired route. On routes marked as Intra-Company, the integration is activated automatically, and calls coming to this route are considered internal.

To activate an outgoing route, click Edit in the Actions section (the Delete button is used to reset the integration settings on this route).

Description — unchangeable field.
Status — activate it to enable integration on this route.
Registration settings — settings that affect call registration in Bitrix24.
How it works. For example, you want to add the info about calls to the Contact entity, on condition the caller's number has already been registered in one or more CRM entities. By setting the priority Contact → Company → Lead, you set the following scenario:- First, the integration module asks Bitrix24 for a list of entities for whom the caller's number is attached.
- Then, if the Contact is in the list, the information about the call is attached to the Contact.
- If there is no Contact, the call is attached to the Company.
- If there is no Company, the call is attached to the Lead.
- If the Lead is absent as well, the system creates a new Lead following the standard scenario. Since by canceling the default logic inherent in Bitrix24, we increase the number of requests made searching for the needed entity, the time the client spends waiting on the line may slightly increase.
CallerID — allows to convert the caller's CallerID to the required format. Changes the CallerID only as part of the call registration. Default value: ${CALLERID(num)}
Call settings — settings that are taken into account during the call.
Show Card — select Yes to display the card in Bitrix24 when making a call.
Exceptions — select a list of users that do not get assigned with calls and do not receive pop-up call cards (to configure the list, please see the Exceptions panel). Employees from the Exceptions list will not have rights to register the call.
AFTER CALL ACTIONS — actions generated after the end of the call.
Assessment of service — if Yes, upon the end of the call, the client will be offered to assess the quality of service (from 0 to 5).
Initial message — voice greeting before assessment.
Final message — voice message after assessment.
6. Registration Upon The Call
Registration upon the call allows you to configure transferring data to Bitrix24 right during the conversation by pressing the key combination "*3". The combination can be edited in the control menu, Feature Codes.

Call settings — actions generated after the end of the call.
Create Lead — select Yes to create a lead or a deal during a call in case there is no registered lead, contact, or deal with this phone number in CRM.
Show Card — select Yes to display the card in Bitrix24 during a call.
Call Registration Priority — Set a successive priority that will guide choosing a CRM entity for registering the info about calls. If the field says Default, the entities are selected following the default scenario set by Bitrix24. By setting your sequence, you abandon the default scenario.
How it works. Lets say, you want to fix the info about calls to the Contact entity, provided the caller's number has already been registered in one or more CRM entities. By setting the priority Contact → Company → Lead, you set the following scenario:
- First, the integration module asks Bitrix24 for a list of entities for whom the caller's number is attached.
- Then, if the Contact is in the list, the information about the call is attached to the Contact.
- If there is no Contact, the call is attached to the Company.
- If there is no Company, the call is attached to the Lead.
- If the Lead is absent as well, the system creates a new Lead following the standard scenario. Since by canceling the default logic inherent in Bitrix24, we increase the number of requests made for searching the needed entity, the time the client spends waiting on the line may slightly increase.
Exceptions — select a list of users that do not get assigned with calls and do not receive pop-up call cards (to configure the list, please see the Exceptions panel). Employees from the Exceptions list will not have rights to register the call.
Assessment of service — if Yes, at the end of the call, the client will be offered to assess the quality of service (from 0 to 5).
Initial message — voice greeting before assessment.
Final message — voice message after assessment.
Additional settings
7. Lines
Line is a phone number displayed in Bitrix24. It is used to determine destinations for outgoing calls. Also, it is used in end-to-end analytics for call tracking set up.

To add a line, click "+" at the panel.

DID — enter the DID that receives a call. This parameter can be identified in the incoming call log (variable FROM_DID).
Number — enter the line number that will be displayed in Bitrix24 telephony and end-to-end analytics.
Outbound Prefix — in order to make a call from Bitrix24 through a certain line, you need to specify the prefix in dial patterns of the corresponding route in the outgoing routing and specify the same prefix in the Outbound Prefix field.
Call back destination — destination for the callback from the site widget. For example, the call can be directed to a queue or to an IVR. Initially, you can choose only the default destination. After setting the lines (link), you will be able to assign each line with a particular destination.8. Task Templates
The templates are used to assign a task to a person responsible for a lead or a contact in case they missed a call.
You can customize templates for each incoming route.

To add a task template click Add at the Tasks panel.

Task Name — name of the task that will be displayed at the task card.
Accomplices — people who help to solve the task.
Observers — people you wish to observe the task.
Deadline — time limit for the task execution set in hours/days.
Task templates are selected in the Routing pints settings.
9. Groups
At this panel, you can create groups of employees that later can be chosen as exceptions so that their members do not participate in the module's work. It means that they will not get assigned with calls and will not receive pop-up call cards.
To add a group click "+" at the panel. It will open the pop-up settings window.
Description — enter the name of the group. Only you will see it.
Members — select group members.

Groups are selected in the "Routing points", "Outbound Routes", "Registration Upon The Call'.
10. Bitrix24 settings
Make sure to specify the extension numbers for the telephony users. To do it, go to the telephony settings:

Telephony → Telephony users

Click on the three lines to the left of the user name, select Settings and enter the extension corresponding to the PBX number. For Click to Call to work correctly, the default number for outgoing calls should be Application: Integration with Asterisk
Also, you can set the default number in the general telephony settings:

As a default number can be tied with a particular line. Make sure to create it beforehand at the Lines panel.

11. Softphone configuration
To execute calls a softphone or a deskphone is required. Here are some options of the free softphones: Zoiper, MicroSIP, Bria.
A softphone is a software program for making telephone calls over the Internet using a general purpose computer rather than dedicated hardware.
To set up a softphone/deskphone the following data is required: FreePBX domain, your extension number, password. These credentials can be found on FreePBX. Go to Applications – Extensions – Press Edit icon and get the password from the Secret field.

Download an application and follow the setup proposed by the chosen softphone. Here is an example for Zoiper:


Then press NEXT-SKIP. Your SIP UDP should be marked as found. The configuration is finished.

Here is an example for MicroSIP:
