About the app
Your work involves selling or serving customers over the phone? Make it an efficient and rewarding process with the Call Center Wizard app.
The application is for you if:
-
You have a small sales department or a contact-center with a high amount of calls;
-
In conversations, the agents feel insecure while reading from paper;
-
The agents already use scripts in their work, but there are too many scripts, and thus the agents get confused;
-
A lot of time is spent on processing info after the end of the call and entering data in CRM;
-
You need to lower the entry threshold for new agents;
-
You are looking for a complex solution that includes CRM + telephony + sales scripts.
The solution does not require any external services or slow-paced integrations! The Call Center Wizard app is an add-on that allows you to unlock the full potential of Bitrix24 CRM for client processing.
Customize the look of the call card, create your own sales scripts, and automate routine actions depending on the result of the call — do all that and more with the Call Center Wizard app.
The supervisor can:
-
place editable CRM fields in the call card;
-
design buttons and select one or more actions to record the result of the call;
-
create scripts in a designer with user-friendly interface;
-
create role models and assign them with scripts and buttons.
The agent can:
-
work with a pre-configured call card;
-
access customer data and save info in CRM without switching to other tabs;
-
work with sales scripts and see the tips for working with clients' objections;
-
record the result of the conversation in two clicks.
Work modes and the call card
The app has two work modes: Client and Script. You can switch between them right in the call card — on the right side of the card there are two tabs with corresponding names. During the call, the agent sees a call card with the app interface and can select an appropriate mode.
On the Script tab, the agent can select a script (if his role implies several assigned scripts), navigate the script, and fill in the fields displayed with certain steps of the script. This tab is helpful if you work with scripts closely.
On the Client tab, the agent sees the CRM fields that are selected in the app settings. This tab is helpful if the main goal is to see the history of interaction with the client and other related data and to have the opportunity to update the info when needed.
The agent can freely switch between the tabs during the call.
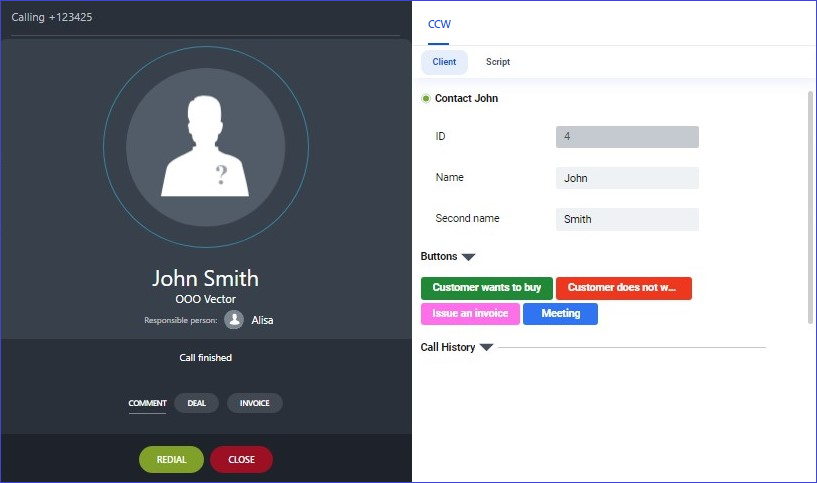
Call card
App Settings
On the app settings page (you can reach it from the item in the main menu of Bitrix24 created with the app installation), there are three tabs: Buttons, Scripts, and Roles. Let's have a detailed look at each of them.
Action buttons
Here you can create buttons that the agents will see on the call card. By clicking on the button, the system performs one or more actions set in advance (it creates a task, sets a callback or a meeting, changes the lead or deal status).
You can create any number of buttons keeping in mind possible work scenarios and business needs. For example, you can create a button for the case when the client is ready to plan a meeting with the company’s representative. By clicking on the Meeting button, the agent can schedule the date and time of the upcoming event right in the call card.
Action buttons in the call card
To create a new button, click Add. Specify the button's name — this text is visible to the agent in the call card, color — it makes it easier for the agent to work with the app, and select actions (one or more) — comment, callback, task, meeting, status changing for lead or deal.
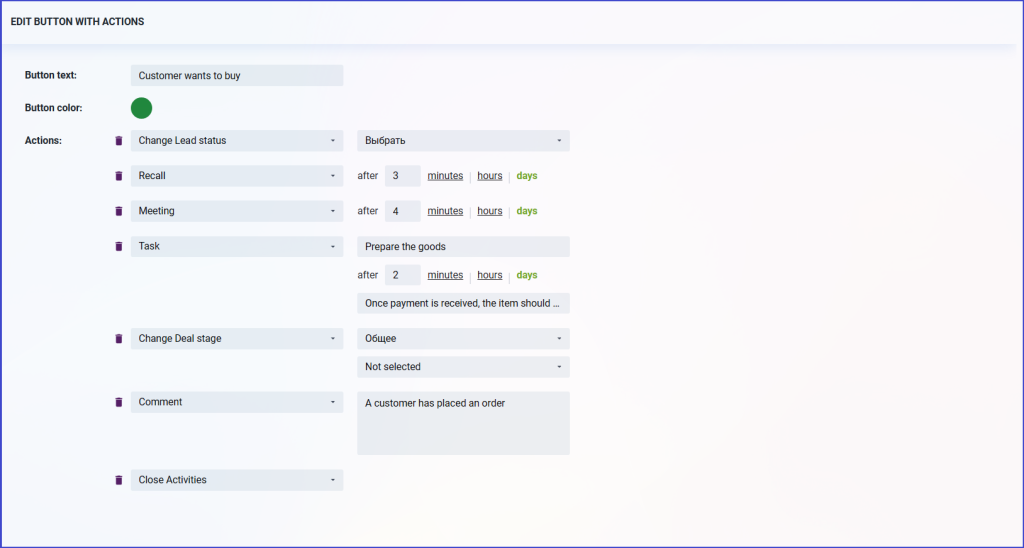
Editing window of the action button
-
Comment — make a comment template for the agent or leave the field empty so that the agent could enter some text. Such a comment will be reflected in the timeline of the CRM card.
-
Call back — set a template for the callback deadline. The agent can change it when creating an action. The information on the created action will be reflected in the timeline of the CRM card.
-
Task — set a template for the task's name and description, as well as its deadline.
-
Meeting — similar to the callback, the action will be created in the client's card timeline. The agent can change the date and time of the meeting while creating the event.
-
Status change — set the status that a lead should be moved to by clicking the button. The agent cannot choose a new status himself. The lead status changed automatically by clicking the button.
-
Stage change — set the stage that a deal is to be moved at by clicking the button. The agent cannot choose a new stage himself. The deal stage is changed automatically by clicking the button.
Having created a button, assign it to a specific role at the Roles tab.
You can change or delete any created button.
Scripts
In this section you can create scripts that agents use in their work with clients. When a call comes in, the agent needs to select one of the scripts assigned to him to keep working. If the agent has only one assigned script, he will not see a selection dialog, and the assigned script will be opened right away.
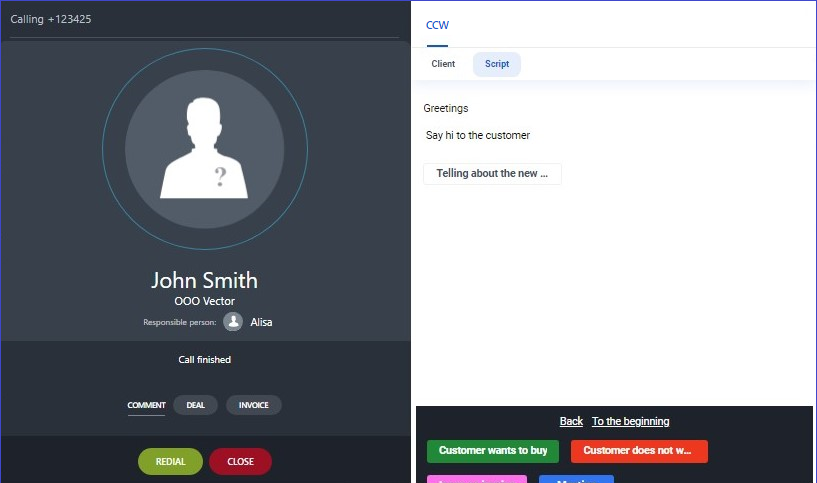
Call card with a script in progress
To create a new script, click Add. Name the script and give it a description.
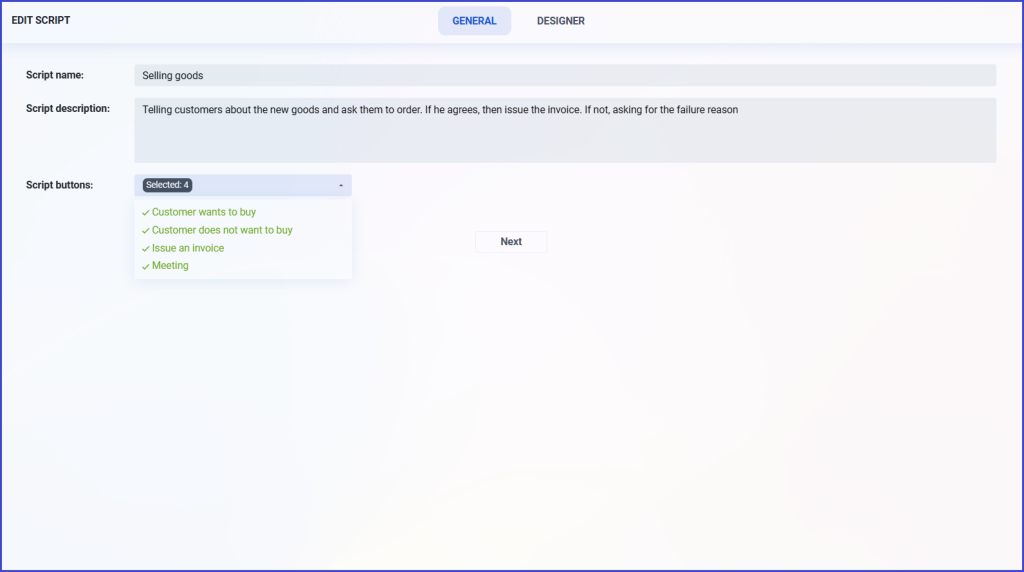
Script editing window
The Designer tab is there for configuring the logic of the script. A user-friendly interface allows displaying the script tree and configuring each step.
You can change the name of the step and its description (text with a tip for an agent) right in the designer. To change the name and text of a step, double-click on the corresponding field and enter your text. It is better to give the steps short, clear names, as the name of the script step becomes the navigation button of the preceding step.
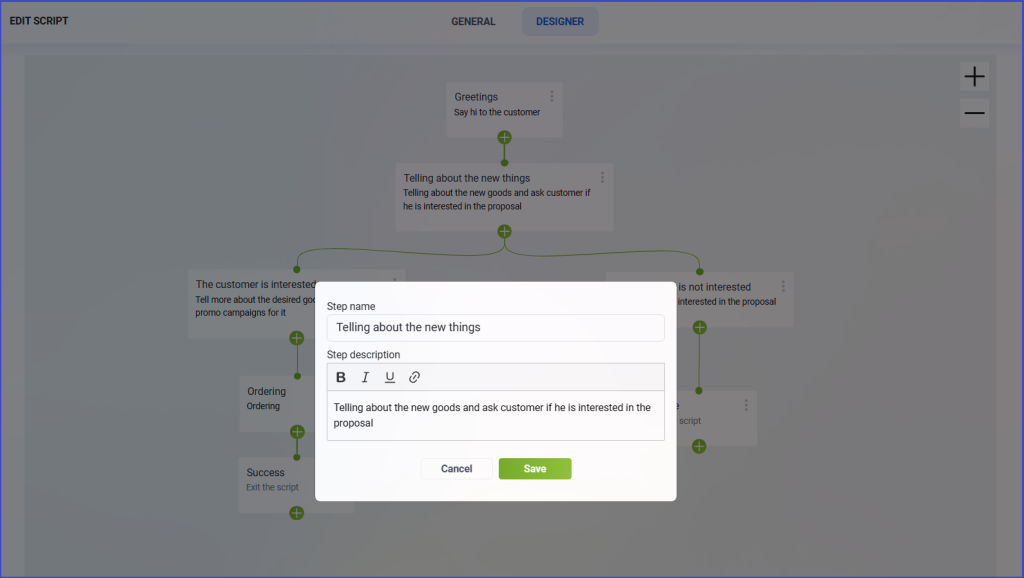
Editing a script step in the Script Designer
To work with the designer, you need to master a few tricks:
-
A single click on the plus sign creates a subsidiary step;
-
You can arrange the steps in the diagram at your liking — we recommend to do it so that one could trace the logic of the script. Use the zoom buttons, if needed;
-
You can click on the plus sign and while keeping the click stretch the connection to another step. This way you can connect the steps from various parts of the diagram;
-
You can select a connection and delete it by pressing the Delete button on your keyboard;
-
To delete a step, use its context menu (three dots in the upper right corner of the block).
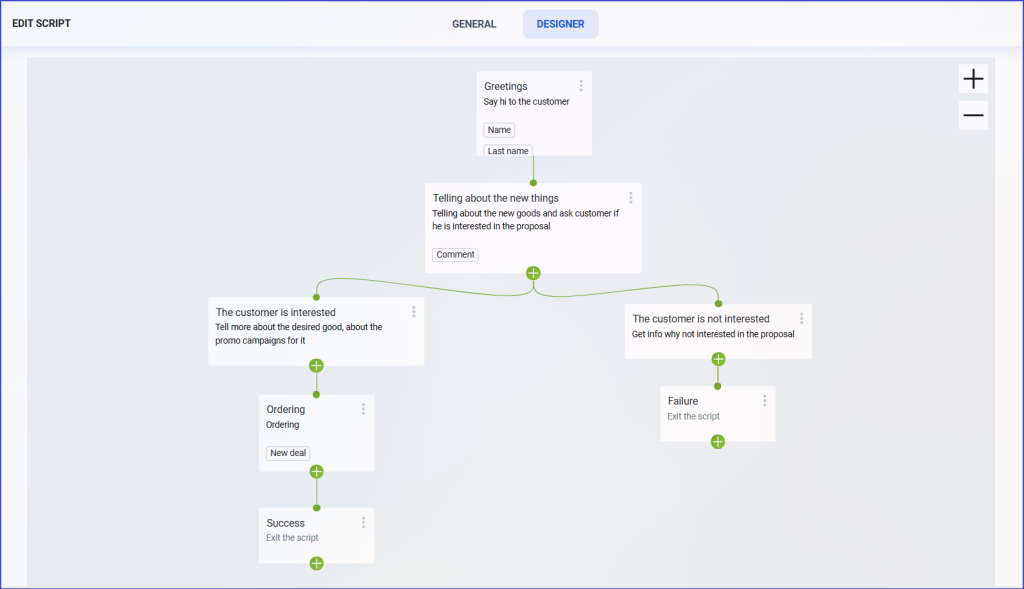
Ready-made script with multiple links among the steps
In the same menu, you can add CRM fields to a particular step of the script. It allows the agent to focus on the most significant details during the conversation. When selecting a field, you can specify whether the agent can edit it or only see the info (the lock icon).
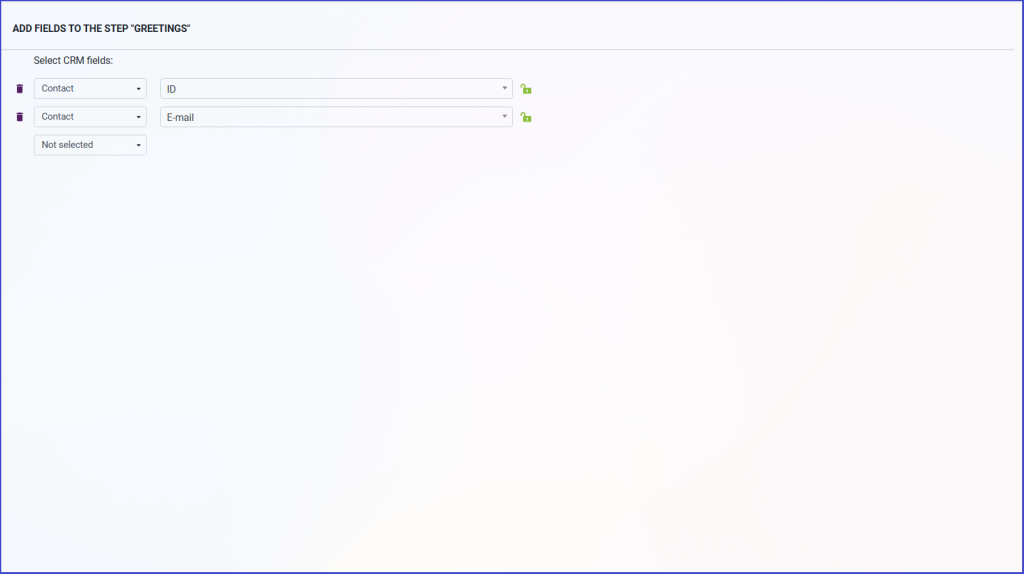
Editing window with CRM fields that are added to the script
During a call, the agent can sequentially follow the script tree. He can follow the navigation buttons (the button has the same name as the corresponding step) to any of the succeeding steps, or go one step back.
Roles
The Roles section allows managing how much access employees have to the information provided by the app and its settings. For the user to start working with the app, he must be added to the user list of one of the created roles.
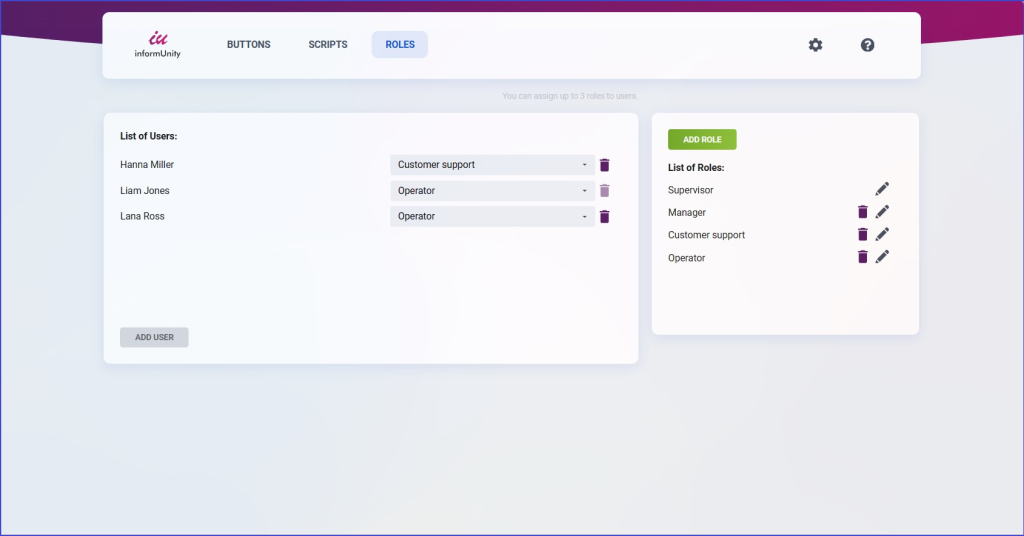
Roles tab in the Call Center Wizard app
Roles determine the access level the users have to the provided info and the look of the call card. You can set the following parameters when creating and editing a role:
-
Keep the call card open even after the end of the call — if this field is checked, the operators with this role will keep seeing the call card even after the end of the conversation (otherwise the call card is closed automatically upon the end of the call). It is useful when the agent needs some time to post-process the information.
-
Allow managing application settings — if this field is checked, an employee with this role will be able to change the app settings.
-
Client tab — here you can configure the exterior look of the Client tab in the call card. You can select CRM fields from the Lead, Deal, Contact, or Company CRM entities. All these fields will be displayed depending on what data is available in CRM for the corresponding customer. Also, here you can assign the action buttons created earlier.
-
Script tab — here you can assign the roles with one or more scripts created earlier.
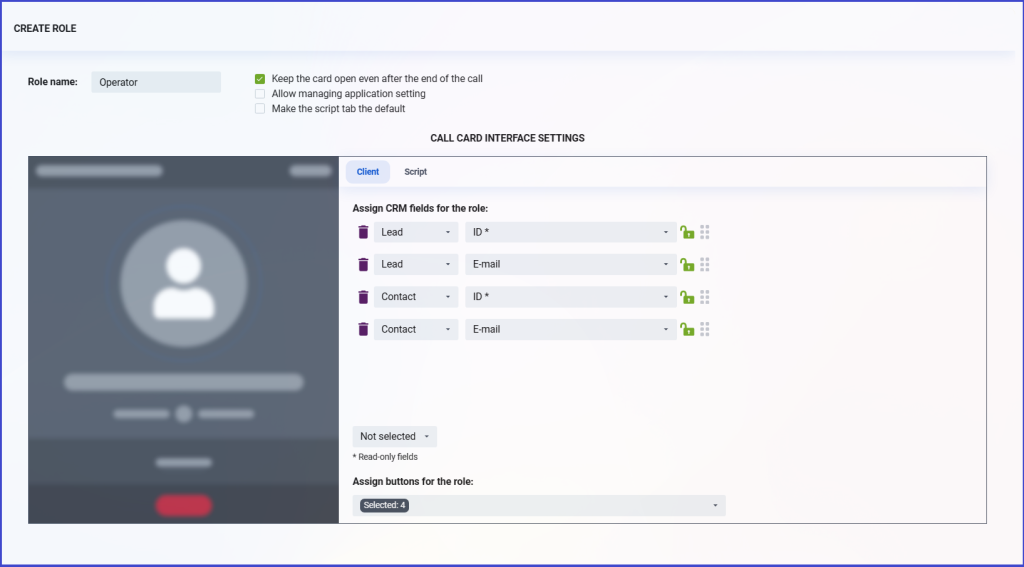
Role editing window
Among all the roles, there is an institutional one. It is created for the administrator, who manages the settings. By default, it is called Supervisor and is assigned to the user who installed the app. The role must be assigned to at least one user.
The number of users in the app is limited by the pricing plan. With the free plan, you can have two active users. As for the extended plans, there are two of them: the first one implies up to 7 users inclusive, and the second one has no restriction on the number of users.
If you do not renew the subscription on time, at the end of the paid period, there will be only two users left with active roles. The administrator of the app will retain the supervisor role, and another randomly chosen employee will keep the assigned role. All other users will be blocked until the next payment. In this case, the data is kept in full, the restrictions affect only the number of active users.
How to buy the app
The basic version of the app — from 1 to 3 users inclusive, is available for free immediately after the installation from the Bitrix24 Market.
The price for the full version - 4+ active users depends on the activation period:
|
Period (months) |
Price for 4+ users, $ |
|
3 |
147 |
|
12 |
529 (-10%) |
You can order the full version (4+) on our website by writing to us in the web chat.
If you still feel uncertain about how it all works, text us in the chat and will be happy to answer all of your questions.
